
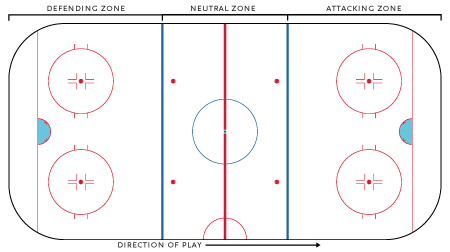
The Rink
Let’s break it down. The rink is basically a rectangle with rounded corners — picture a swimming pool shape.
At each end is the goal crease, the half-circle in front of the net. That’s the goalie’s territory and marks the scoring area. Players can’t interfere with the goalie while they’re in the crease, or a penalty will be assessed.
In the center of the ice is the center circle with a dot. This is where the game starts and where faceoffs happen after goals or certain stoppages.
Two blue lines divide the rink into three zones:
Defensive zone — near your own net.
Neutral zone — the middle area where transitions happen.
Offensive zone — near your opponent’s net.
Another way to explain it:
Defensive Zone: Where you protect your net.
Neutral Zone: The "no man's land" between the blue lines.
Offensive Zone: Where you try to score.
These lines are key for rules like offsides.
Near each net, you’ll also see faceoff circles — that’s where the puck is dropped when play stops in that area.
The rest of the lines and markings? Don’t stress. Once you start skating and playing, they’ll start to make sense. Think of them as a map guiding you where to be during the game.